Digital Storytelling

Digital storytelling is a great way to extend and enhance project based learning! For my class’s financial literacy project, where students devise a plan detailing the necessary steps to open their own restaurant, I created a digital story using Adobe Spark to demonstrate to students the importance of being able to add and subtract decimals. This directly ties into TEKS 6.1A and 6.3D. TEK 6.1A addresses the skill of determining what math is needed to solve a problem, and TEK 6.3D expects students to add, subtract, multiply, and divide numbers fluently.

In the digital story I created, the main characters, Zach and Sally, must determine what math is needed to calculate their bill at the restaurant they’re eating at since the restaurant’s cash register is not working. They take out a piece of paper and add and subtract decimals in order to calculate the total cost as well as how much change they should receive.

I plan on showing students this digital story at the beginning of the financial literacy unit so that it gives students an idea of why math is important and relevant in the real world! The digital story will serve as a “hook” for the financial literacy project and get them excited for learning and utilizing math in a real-world setting.

To see the digital story I created using Adobe Spark, follow this link!

Screencasting – How do I use it in the classroom?

Screencasting…what is it? Screencasting is a digital recording of your computer screen and usually includes audio narration. For a math class, the uses for screencasting are endless! In fact, screencasting is one of my favorite digital tools to use and has allowed me to teach virtually during the COVID-19 pandemic! I use a chrome extension called web paint to write on my screen and utilize screencasting to record myself solving problems on my computer screen! I upload these screencasts to YouTube for students to watch as they are working on their assignment. Sometimes I also embed my screencasts into the Google slidedecks/Peardecks I create for students to do their math assignments.

My favorite tool to use for screencasting is Screencastify. Unfortunately, you have to purchase the premium version to really use it, but there are other great screecasting tools out there that are free. Screencast-O-Matic is probably the best free screencasting tool available, and I definitely recommend it!

Because I use screencasting so much, it should come as no surprise that I chose to utilize Screencastify for my 6th grade math class’s latest Financial Literacy Unit Project! Via Screencastify, I recorded myself making a tutorial for students on how to use Google Jamboard. Below, you can see how they will utilize Google Jamboard in their project:

Name: Google Jamboard

URL: https://edu.google.com/products/jamboard/

Description of use: Online whiteboard that can be used for collaboration, drawing, and writing

Activity Type: Opening a new restaurant

Pedagogical Goal: Students will use Google Jamboard to collaborate and plan the opening of their new restaurant. Students will compare the features and costs of a checking account and debit card offered by various local banks or credit unions in order to open a checking account for their new restaurant, identify the information included on their credit report, as well as explain why a credit report is important to a bank when applying for a loan for their new restaurant, balance the new restaurant’s checkbook by including deposits, withdrawals, and transfers that have occurred/will occur during the opening process, as well as compare the salaries of different jobs and the levels of training or education required for those jobs as students begin to hire employees and plan for the cost of their salaries for the new restaurant.

To see my screencast tutorial for Google Jamboard/to see what screencasting looks like, check out my video below!

Learning Life Podcast – Extending Project Based Learning

In my last post, I wrote about a Project Based Learning unit I created for 6th grade mathematics students! In the PBL unit, 6th graders will devise a plan detailing the necessary steps to open their own restaurant. They will document their plan and its journey through the use of Edublogs. In their plan and blog posts, students will compare the features and costs of a checking account and debit card offered by various local banks or credit unions in order to open a checking account for their new restaurant, identify the information included on their credit report, as well as explain why a credit report is important to a bank when applying for a loan for their new restaurant, balance the new restaurant’s checkbook by including deposits, withdrawals, and transfers that have occurred/will occur during the opening process, as well as compare the salaries of different jobs and the levels of training or education required for those jobs as students begin to hire employees and plan for the cost of their salaries for the new restaurant.

In order to aid students in their journey to opening a new restaurant, I created a podcast where I interviewed local business owners! In my latest podcast, I interviewed Mr. Adam Garza, owner of the restaurant, Gulf Coast Crepes – he and I discussed why he opened a restaurant, how he chose what bank to use, how he manages his restaurant’s expenses, and more! Allowing students to listen to a local restaurant owner allows them to glean new insight and understanding into what it takes to own a business in the real world! Plus, they will be able to take what they learned from the podcast and apply it as they develop their own plan for opening a restaurant!

I shared the podcast with students after they received the project’s instructions and before they started working on their restaurant’s plan. This way they have a model and some direction before they start their project’s journey. We also discussed the podcast as a class before they started working as well – it was important to debrief and share out thoughts!

To listen to the latest episode of the Learning Life Podcast where I interview Mr. Garza, check it out below!

Project Based Learning for 6th Grade Math

What is Project Based Learning (PBL)? According to PBLWorks, “PBL is a teaching method in which students learn by actively engaging in real-world and personally meaningful projects.”

The idea of PBL was new to me at the beginning of this semester, but I have since dived right in! I was initially introduced to PBL through one of the units in my Intro to Educational Technology course at Texas State University. In the unit, my professor, Dr. Holschuh, tasked us with creating a meaningful PBL assignment for our respective content areas, and for me, that meant 6th grade Math. I would be lying if I said the idea of creating a PBL assignment for 6th grade math students wasn’t daunting, but I can happily report that I prevailed! Curious as to what I came up with? Well, let me share!

Before I share, you need to be aware that a PBL assignment has several required components: course, grade level, a main topic, a guiding question, a description, a final project/deliverable, and learning standards aka TEKS! Did I mention that a PBL assignment also needs to be cross-curricular?

So…here’s what I came up with:

Course/Grade Level –> 6th grade Math

Main topic –> Personal Financial Literacy

Guiding question –> What can I do to make sure that I will be successful when earning (making) and managing (being in charge of) money?

PBL description –> Students will devise a plan detailing the necessary steps to open their own restaurant. They will document their plan and its journey through the use of Edublogs. In their plan and blog posts, students will compare the features and costs of a checking account and debit card offered by various local banks or credit unions in order to open a checking account for their new restaurant, identify the information included on their credit report, as well as explain why a credit report is important to a bank when applying for a loan for their new restaurant, balance the new restaurant’s checkbook by including deposits, withdrawals, and transfers that have occurred/will occur during the opening process, as well as compare the salaries of different jobs and the levels of training or education required for those jobs as students begin to hire employees and plan for the cost of their salaries for the new restaurant. Students will use an app called Checkbook – Account Tracker to balance their new restaurant’s checkbook.

Final project/deliverable (assessment) –> 2-3 local restaurant owners and other students will provide critique by adding comments on the students’ blog posts. Additionally, students will complete a self-reflection of both themselves and their group mates, and teachers will complete a rubric in order to give feedback.

TEKS addressed

  • Determine what math is needed/used to solve a problem 6.1(A)
  • Use a problem-solving model to solve a problem 6.1 (B)
  • Add, subtract, multiply, and divide numbers fluently 6.3(D)
  • Compare the features and costs of a checking account and debit card offered by two or three local banks or credit unions 6.14(A)
  • Balance a checkbook by including deposits, withdrawals, and transfers 6.14(B)
  • Identify what information would be included on a credit report and how long that information will stay on a credit report 6.14(E)
  • Explain why a credit report is important to a bank when applying for a loan 6.14(D), 6.14(F)
  • Compare the salaries of different jobs and the levels of training or education required for those jobs 6.14(H)

I am definitely excited to implement this PBL assignment at the end of the year when we cover Personal Financial Literacy! I’ll be sure to provide some pictures and updates via my blog after-the-fact. Wish us luck! Leave your comments, ideas, and suggestions down below!

Waiting for STAAR Results

The STAAR test is over, but now we have two weeks until we know who passed and who failed…what do we do?

For my team and me, we decided to have some students complete a STAAR Re-test Review Packet and a few select students complete a great project I found on Teachers Pay Teachers entitled, “End of Year 8th Grade Math Choice Board.”

Screen Shot 2018-04-28 at 10.43.37 PM

We were able to determine how to split-up the students by using the data from the Mock Math STAAR the students took in the middle of the year. If a student received a score of 60% or greater, we had them work on the End of Year Choice Board Project. Any student whom scored below 60%, worked on intervention activities included in the packet we created and received small group, targeted instruction.

Overall, this strategy worked very well! It was great to work with students in small groups, as well as individually, and it was even better to see the students demonstrate their creativity through the various projects offered through the Choice Board.

I think the creator of the Choice Board activity, Lindsay Perro sums the project up perfectly when she writes, “This end of the year activity allows students to demonstrate their understanding of key skills in a way that best suits them. Not every student can show they understand a concept by writing an essay. Not every student could make a commercial, or a PowerPoint presentation. Since it is the end of the year, give your students a chance to really shine in the way that makes them happiest! Some of the options include making brochures, PowerPoint Presentations, writing quizzes, etc.”

Even one of my team members (Sterling Chan) enjoyed the opportunity to utilize his creativity. He created a rap for The Pythagorean Theorem. I definitely encourage you to check it out.

In brief, the time spent waiting for STAAR results can be used very effectively. Using the time to pull students into small groups and providing differentiated instruction for GT students through a project worked really well for me and my team. We feel like our students received an extra push toward success as we prepare for SSI (student success initiative aka state mandated intervention) the next two weeks.


How to Digitalize Your Math Class

This year I have really made an effort to digitalize my classroom. This is ironic because when I first began teaching, I scoffed at the idea of digitalizing a Math class. HA! I have learned a lot since then and wanted to share just a few ways I utilize technology in my class.

The easiest way a teacher can incorporate technology in their classroom is through the use of Google Classroom. Google Classroom is a free web service developed by Google for schools that aims to simplify creating, distributing and grading assignments in a paperless way. I have loved using Google Classroom because it allows me to upload all notes and assignments on a digital platform. Not only am I able to share what I create, but also the students can turn in their assignments through Google Classroom as well. This platform has increased immediate feedback in my class, and it has served to engage the students! Plus, it has allowed me to upload links for students needing oral test administration. They just follow the link to a site called eduphoria, and use the Google Read&Write extension to listen to the test. Instead of fighting the technology craze, let’s embrace it! Did I mention that Google Classroom also adds all assignments to a class calendar? No more questions about due dates or missing assignments!

This slideshow requires JavaScript.

Overall, Google Classroom is a great way to engage students and to digitalize your classroom and so are other programs Google has created. Let’s explore how Google slides and Google forms have helped me digitalize the classroom.

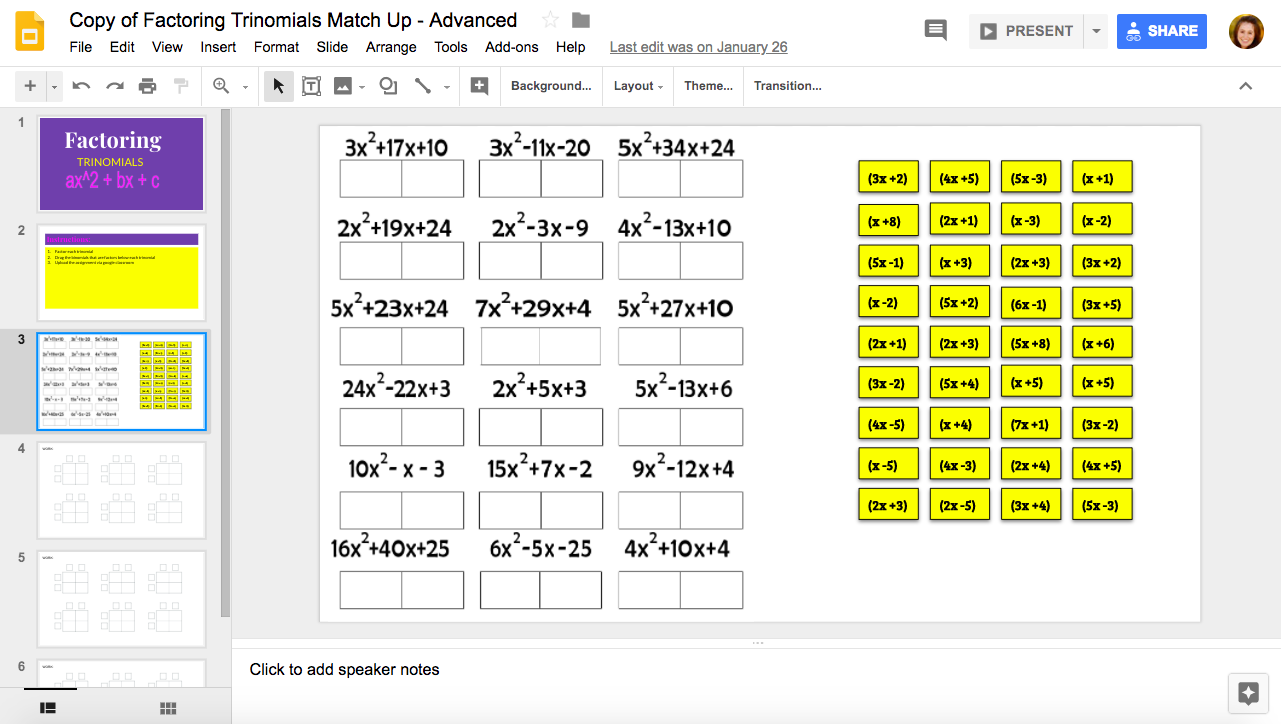
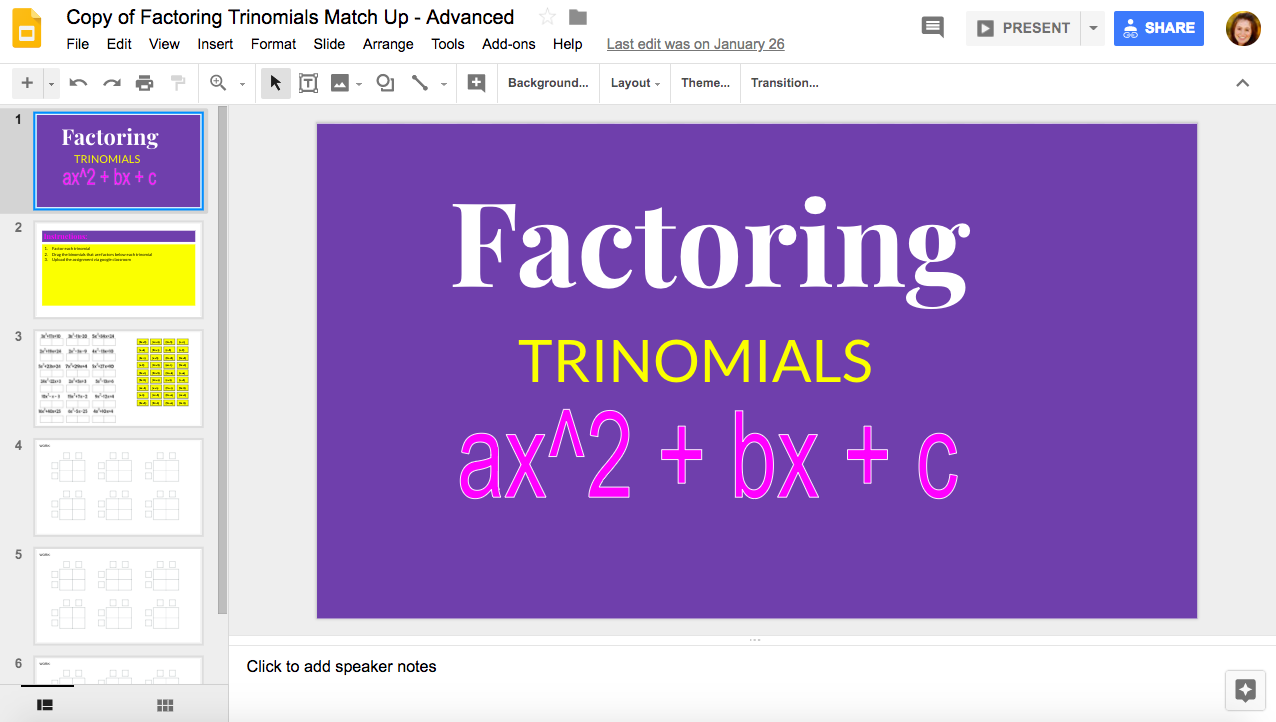
Between Google slides and Google forms, I probably use Google slides the most, and here’s why: it allows me to digitalize task cards, card sorts, puzzles, and card matches, and not only does it digitalize these activities but also makes them interactive. Here’s an example of a card match I created to help my students factor trinomials. The students enjoyed the activity because they got to use a laptop to complete it, I didn’t have to use paper, and grading this assignment was extremely fast and easy!

If you do decide to create activities using Google slides, be sure that you make a copy of your original work and only share the copy with your students. Once the students open the copy, have them make a copy, re-name it, and save it to their Google drive so that no one changes the assignment you shared and created. If for some reason a student ignores your directions and makes a change to the assignment you shared, it’s okay because you shared a copy of the original.

Screen Shot 2018-04-29 at 11.02.28 AMScreen Shot 2018-04-29 at 11.02.02 AM

If you are interested in using this card match I created, just follow the hyperlink, make a copy, and save it to your drive. Of course you’re also welcome to purchase it from me as well. Head to my store at Teachers Pay Teachers to show this young teacher a little love.

Finally, I also use Google forms to digitalize my classroom. I usually like to use Google forms for test reviews or assessments. Here are a few reasons why: Google forms breaks down each question and gives you data. How many students got the question right, how many got it wrong? What were the most missed questions? Google forms gives you all of those answers. Plus, because the students actually choose the correct answer or type it in, Google forms grades the assignment for you and provides the students with an answer key to each question (you can choose to enable this feature or disable it).

My students told me that they liked doing test reviews and assessments through Google forms because it gave them immediate feedback. They liked that I provided them with the answer key as well as the work for each question; it allowed them to see where they went wrong immediately.

This slideshow requires JavaScript.

In brief, I have really enjoyed incorporating technology into my classroom. Like I said, when I first began teaching I fought it, but I have since decided to embrace it. I am so glad I did!

Please leave a comment below or share how you incorporate technology into the classroom. I would love to hear your ideas!